When creating new users, a set of default fields is available. Additional custom fields can also be created to collect further information. This page explains the process for setting up user fields.
User Fields Topics
Default User Fields
The following groups with user fields are available by default:
-
User Details
-
Personal Details
-
Payroll Details
-
Bank Details
User Details
For all user details fields they can be configured to have different editable settings:
-
Always Editable
-
Read Only at Site
-
Read Only if Employee Import Used
Other Groups
Depending on the group and field the different settings could apply, the following table outlines each setting and its corresponding functionality.
| Setting | Description | Additional Information |
|---|---|---|
| Group Selection | ||
| Group |
The group the field is assigned to, this is the tab that will be displayed in Staff & Security |
Default fields can be changed to other groups if required |
| Field Details | ||
| Label Text |
The text displayed next to the input |
|
| Field Type |
The field type defines what type of input will be resented to the back of house operator The following field types are:
|
|
| Reference |
If data is imported from a third party system the reference is used for data mapping |
|
| Mandatory |
When enabled the field will become mandatory and require the back of house operator to enter data into the selected field |
|
| Unique Per Location |
When enabled any employees that have access to multiple locations must have unique data per site |
|
| Edibility |
Defines if the field can be edited with the following options:
|
|
| Field Length and Mask | ||
| Max Field Length |
The maximum number of characters that can be entered into the field |
|
| Mask |
Masks enable the field to have data input in a specific format ensuring data collection is accurate
|
|
| Default Value | ||
| Default Value |
The default value completed when a new user is created by a back of house operator When a field type of 'check box' is used the default value can be set as either checked on unchecked |
|
| Selection List | ||
| List Values |
When a field type of 'selection list' is used values can be added which are then displayed to the back of house operator when adding users |
|
Adding User Defined Fields
Follow these steps to add user defined fields:
-
Click Add
-
Select the required Group, or select Add New from the drop down to create a new group
If a field was already selected from the user fields list when clicking 'Add' the group selection screen will not be displayed, if the field gets added to the wrong group this can be edited after setup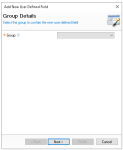
-
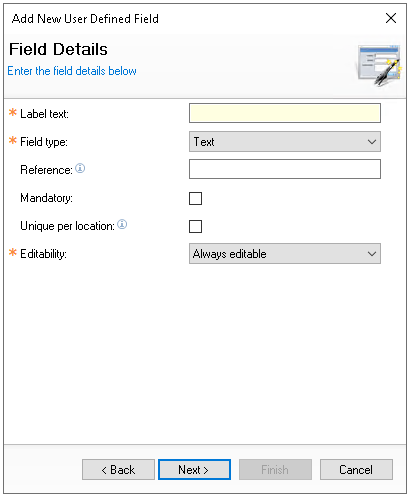
Enter the Label Text
-
Select the required Field Type
-
Set the other settings on the Field Details screen based on the configuration of the field type
-
Click Next
-
The settings displayed in the second step will be defined based on the field type selected, complete details as required
-
Click Finish

Reordering Fields
The order of fields within a selected group can be rearranged, allowing them to be displayed according to the required setup.
Follow these steps to reorder fields:
-
Select the required field
-
Click Reorder
-
Use the Up / Down Arrows against both Groups and Fields to reorder
-
Click Save
Removing Fields
Follow these steps to remove fields:
-
Select the required field
-
Click Remove
-
Click Yes to confirm the removal of the field
Any data held against the field for any user will be deleted when a field is removed